▶ Watch the 4-minute video: youtu.be/I4gr120Hvls
The 60-second version
- Transcribe a clip or sequence on the Transcribe tab, as before. The captions open in the Captions tab by themselves.
- Press ▶ Add to timeline. Styled, animated captions land on a new video track above your footage.
- Scrub through. Fix a name in ① Check the text, set one or two lines in ② Lines & caps, try a different look in ③ Look. Every change updates the clips on the timeline as you make it.
- Made a change you don't like? ⌘Z. One press undoes one whole CaptionLab step.
Open your captions
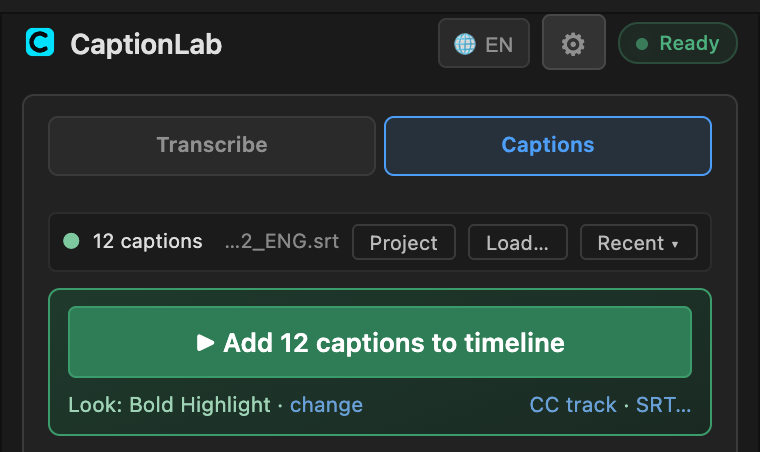
After a transcription the Captions tab already holds the result. To work on captions you made earlier, use the source row at the top:
- Captions tab: everything in this guide lives here.
- Project: opens the .srt selected in Premiere's Project panel.
- Load…: opens an .srt or .captionlab.json from disk.
- Recent: the last files you opened or transcribed.
- ▶ Add to timeline: puts the captions on the timeline now.
- change: jumps to ③ Look.
- CC track: Premiere's own caption track instead of graphics.
- SRT…: saves a subtitle file.
Opening an .srt that CaptionLab saved also reads the small .captionlab.json next to it, so the exact timing of every word comes back. A plain SRT from somewhere else works too; the words are then spread evenly through each caption.
 12345678
Recent
The last eight files you opened or transcribed. Handy when you jump between two cuts of the same episode, or between language versions.
.srt straight onto the panel.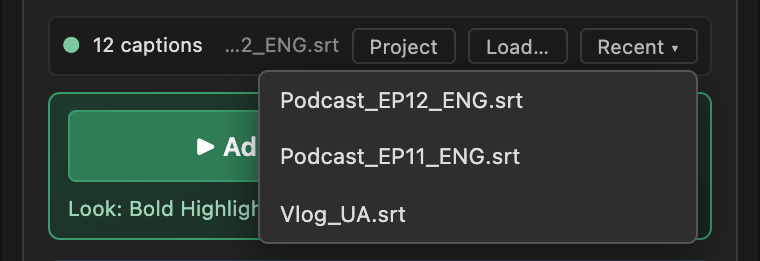
▶ Add to timeline
The big green button puts the captions on a new video track above your clips, one graphic clip per caption, in the look shown under the button (Look: Bold Highlight · change). Your footage and any existing tracks are never touched.
Don't need animated graphics? The two links on the right make the other formats from the same captions:
- CC track: Premiere's own caption track, for accessibility, broadcast or a YouTube upload with selectable subtitles.
- SRT…: a file for YouTube, Vimeo or a client.
1Check the text
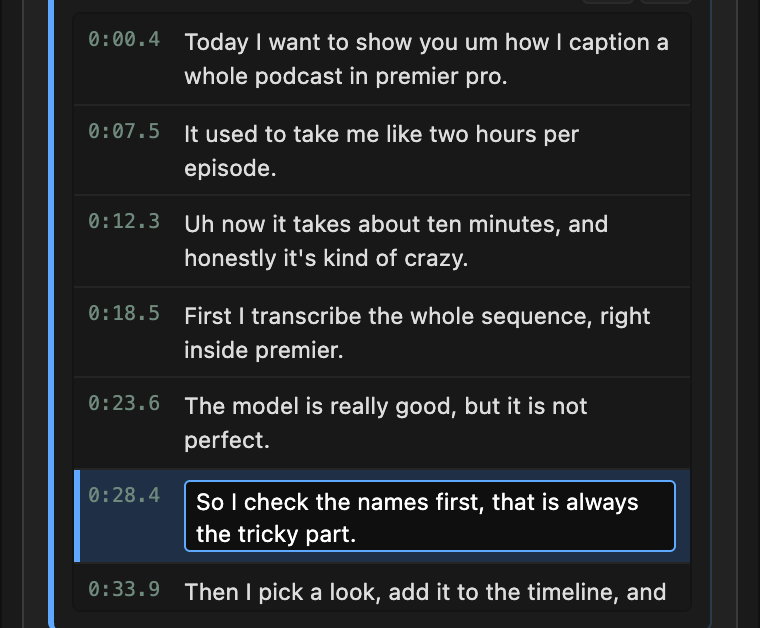
This step is about what the captions say. The list shows every caption with its start time. Click one and Premiere's playhead jumps there; while the video plays, the list follows along and highlights the caption on screen.
Fix one caption
Double-click a caption to edit it in place. Arrow keys, Home/End and copy-paste work as in any text field.
- Enter saves, Esc cancels.
- The clip on the timeline updates at once.
- Edited captions get a small ✎ in the list.
Keyboard: ↑/↓ move through the list, Enter starts editing the selected caption.
 12
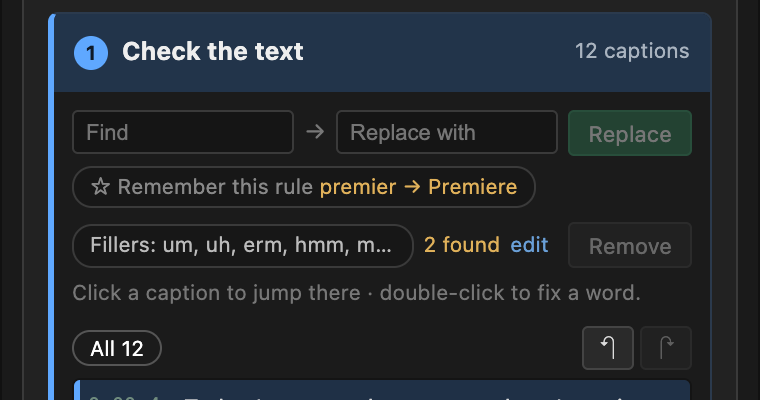
Find → Replace
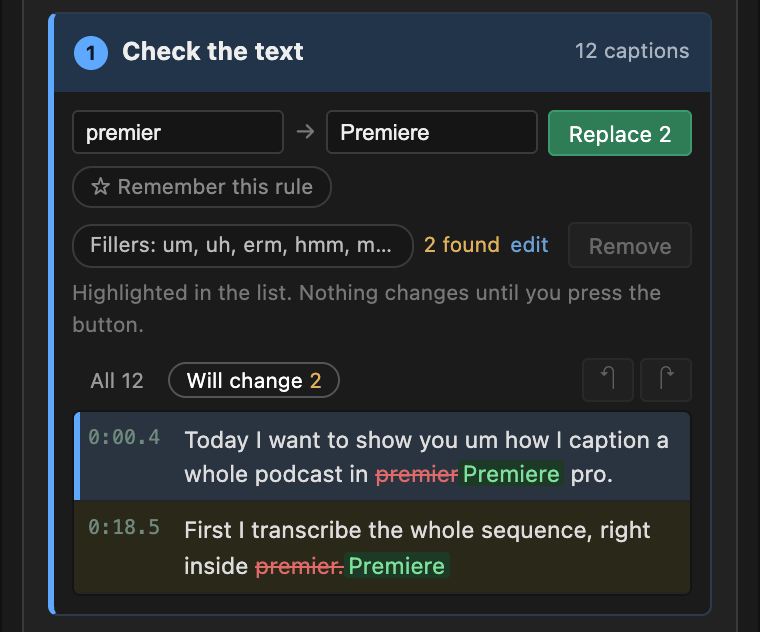
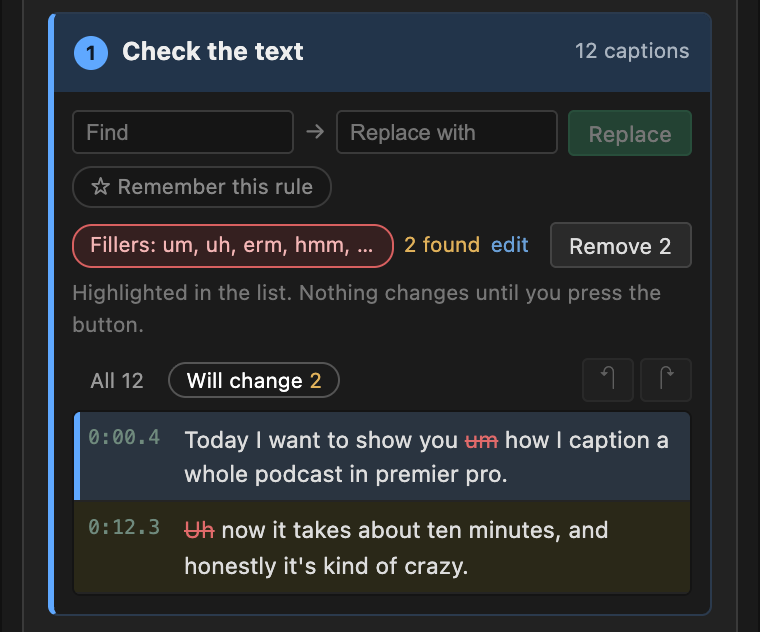
The fastest way to fix a name the model keeps mishearing: type what to find and what to put instead. Nothing changes yet. Every match is shown in the list first, the old word struck through in red, the new one in green.
- Find: what to look for.
- Replace with: what to put instead (leave empty to delete).
- Replace N: does it, as one undo step.
- ☆ Remember this rule: keep it for your next videos.
- Will change: shows only the captions that will change.
- The preview: old word struck through, new word in green.
- It matches whole words, ignores capitals and keeps the punctuation (premier, → Premiere,).
- Several words work: premier pro → Premiere Pro.
- Leave Replace with empty to delete a word everywhere. The button then says Remove N.
 123456
Saved rules for your next videos
Names, brands and slang come back every episode. Press ☆ Remember this rule and the pair becomes a chip you can apply with one click next time. Already pressed Replace? The button remembers the replace you just did, and shows it.
- ☆ Remember this rule, showing the replace you just did.
- Undo / Redo for text changes, the same as ⌘Z.
Right-click a saved chip to delete it.
 12
Fillers
“Um”, “uh”, “like”: fine in speech, noise in captions. Click the Fillers chip to see every one of them struck through in the list, then remove them all in one go.
- Fillers chip: shows them in the list.
- How many were found.
- edit: your own list of fillers, for your language.
- Remove N: takes them all out in one step.
- Each filler struck through before it goes.
The list is yours: edit it for your language (e.g. ну, типу, eee, yani). A filler also matches when it's stretched (“ummm”). Commas and capitals around a removed word are tidied up for you.
 12345
2Lines & caps
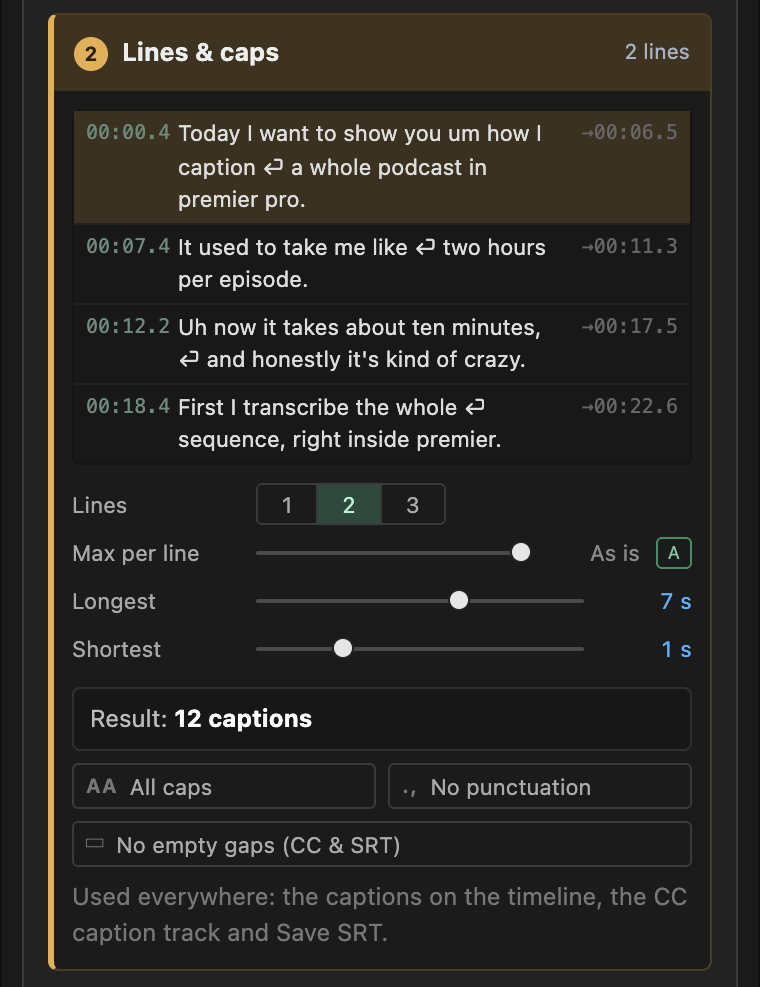
This step decides how the captions are cut and shown, and it is shared by everything you make: the graphics on the timeline, the CC track and the SRT. The four captions at the top show the result as you change things.
- The first captions, exactly as they will be cut and shown.
- Lines: 1, 2 or 3 per caption.
- Max per line: characters per line.
- A (As is): the cut the model made.
- Longest: no caption stays on longer than this.
- Shortest: no caption is shorter than this.
- Result: how many captions you will get.
- All caps
- No punctuation
- No empty gaps in the CC track and SRT.
 12345678910
Good starting points
| Video | Lines | Max per line | Longest | Caps / punctuation |
|---|---|---|---|---|
| Reels · Shorts · TikTok (9:16) | 1 | 14–20 ch | 2–3 s | All caps on, no punctuation |
| YouTube (16:9) | 2 | 38–42 ch | 6–7 s | Keep both |
| Podcast clips | 2 | 30–34 ch | 4–5 s | Keep punctuation |
| Client / broadcast SRT | 2 | 42 ch | 7 s | Keep both, shortest ≥ 1 s |
No empty gaps (CC & SRT) stretches each caption to the next one in the CC track and the SRT file, so the text doesn't blink off between phrases. Pauses longer than Up to stay empty. For the graphics on the timeline, use the Close gaps tool instead.
3Look
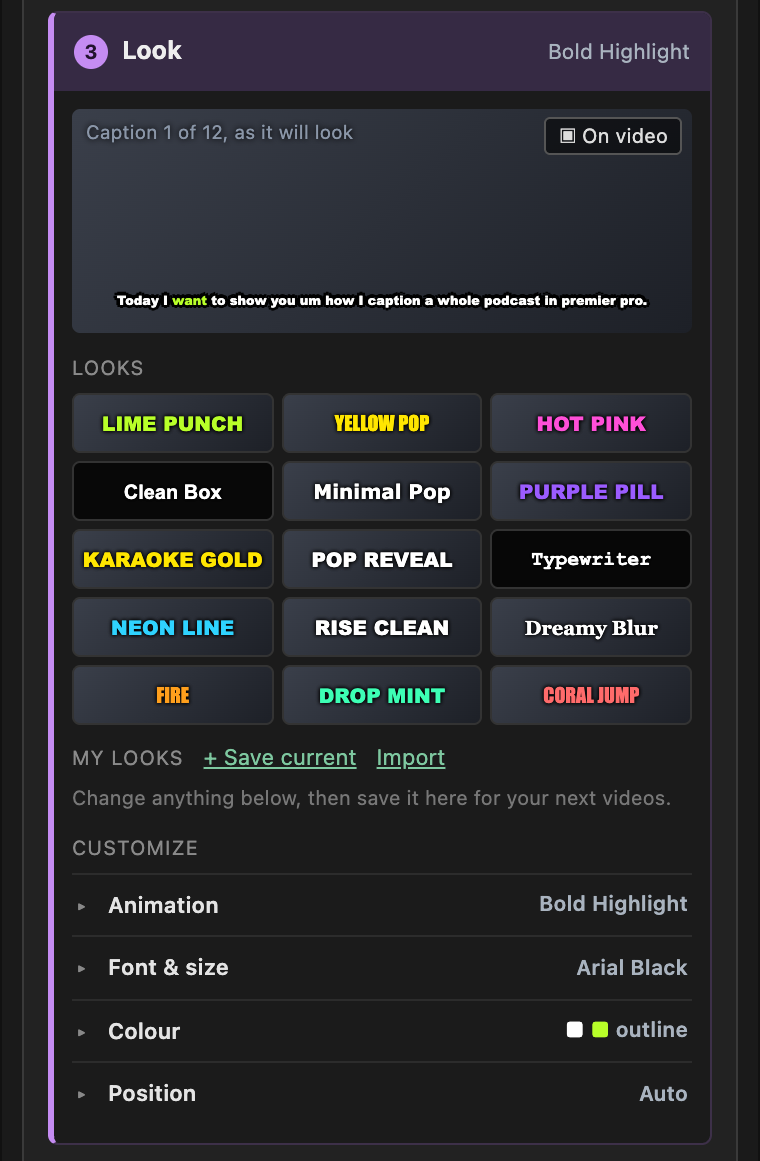
Everything about how the graphic captions look. The preview at the top plays your own caption with the current animation, so you can judge a style before anything touches the timeline.
- Live preview of your own caption, playing the animation.
- ▣ On video: the preview on your real frame.
- Ready looks: one click sets style, font and colours.
- + Save current: keep your look under My looks.
- Customize: Animation, Font & size, Colour, Position.
A ready look sets the style, font, colours and outline in one click. Change anything after that and the look shows (edited); + Save current keeps it under My looks for your next videos. Right-click a saved look to delete it. Import and Export move your looks between computers, or to the rest of your team.
 12345
See it on your own video
▣ On video takes the frame under Premiere's playhead and shows the caption on it, in your sequence's shape (16:9, 9:16, 1:1). Click a caption in the list and the frame follows. ↻ New frame grabs a fresh one, × goes back to the plain background.
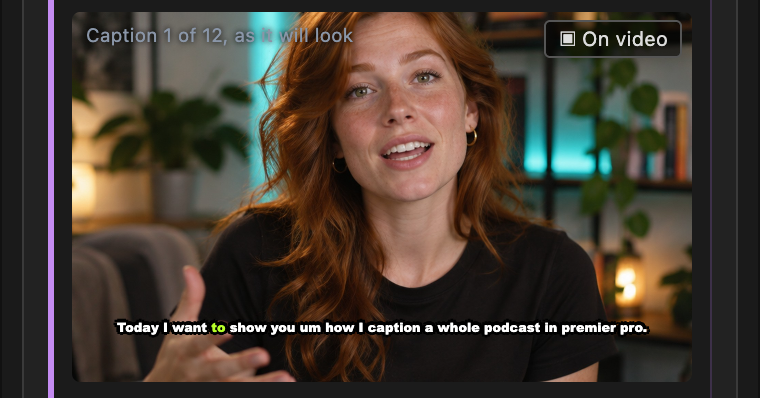
Change the look, live
With the captions on the timeline, click another look and watch every clip follow, starting nearest the playhead, so the caption you are looking at changes first.
The 12 animations
Open Customize → Animation. Every style follows the speech word by word, using the timing from the transcription.
| Style | What it does | Good for |
|---|---|---|
| Bold Highlight | Whole phrase visible, the spoken word lights up | The all-rounder |
| One Word Pop | One word at a time, with a punch | Fast Reels, hooks |
| Karaoke Fill | Colour fills each word letter by letter | Music, rhythm |
| Pill Highlight | A coloured pill jumps under the spoken word | Brand colours |
| Word Reveal | Words appear as they're said and stay | Storytelling |
| Typewriter | Letters typed out with the speech | Tech, tutorials |
| Underline | A bar slides under the spoken word | Clean talking heads |
| Rise Up | Letters rise and fade in | Calm, premium |
| Blur In | Each word comes into focus | Moody, cinematic |
| Drop In | Words drop in from above; the spoken word lights up | Energetic edits |
| Jump | The spoken word hops up and lights up | Playful, comedy |
| Static | No animation, still fully styled | Interviews, docs |
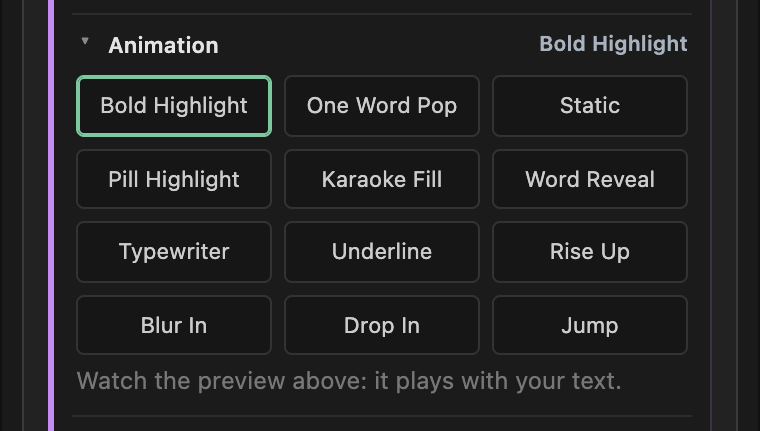
Font, colour, position
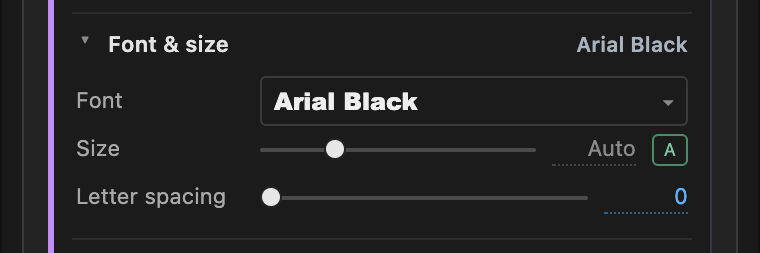
Font & size. Any font installed on your computer, with the recommended bold display faces first. Size on Auto fits the caption to your frame; Letter spacing opens up heavy fonts.
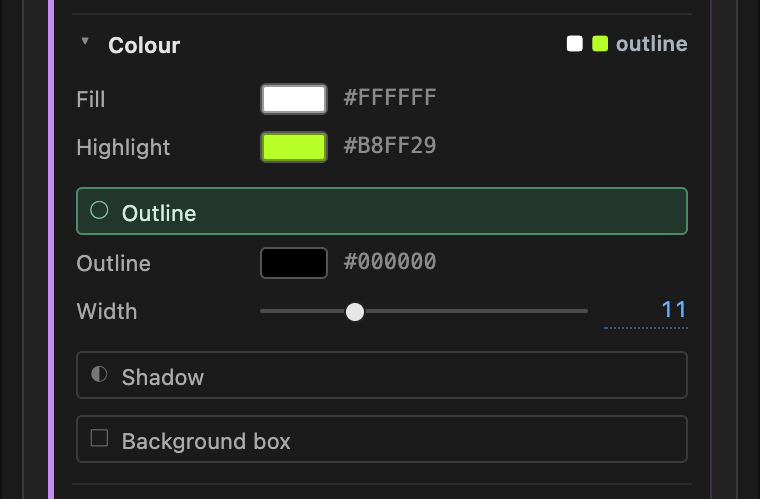
Colour. Fill is the text, Highlight the spoken word (or the pill, the bar, the karaoke fill). Click a swatch for the picker with an eyedropper. Then Outline with width and colour, a soft Shadow, and a Background box with opacity, padding and roundness.
- Fill: the colour of the text.
- Highlight: the spoken word (or the pill, bar, karaoke fill).
- Outline, with width and colour.
- Shadow, with strength.
- Background box, with opacity, padding and roundness.
 12345
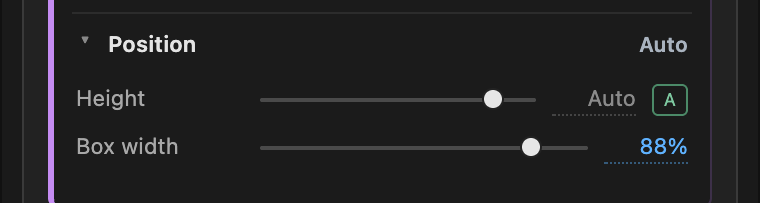
Position. Height moves the captions up or down; Box width is how wide a line may get before it wraps or shrinks. On Auto both follow your frame, so the same look works in 16:9 and 9:16.
On the timeline
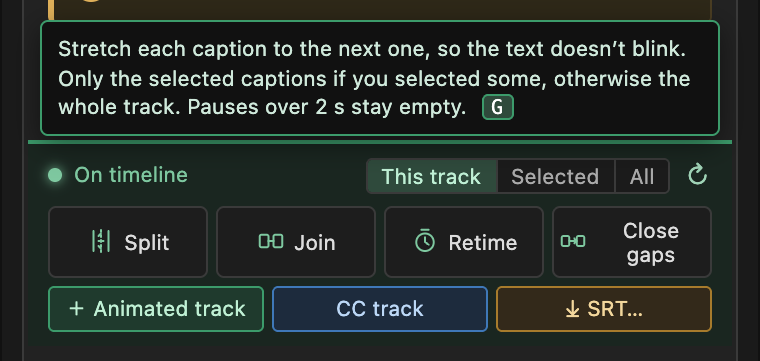
Once the captions are on the timeline, the bottom of the panel turns green. From now on every change applies to the clips as you make it: a word, a line count, a colour, a font. No export, no re-import.
- On timeline: changes apply as you make them.
- Apply to: this track, the selected clips, or all.
- ↻ reads the captions back after you edit them in Premiere.
- Split S
- Join J
- Retime R
- Close gaps G. Hover any tool for its help, as here.
- + Animated track: another copy, with the current look.
- CC track: Premiere's caption track.
- SRT…: a subtitle file.
 12345678910
Make one phrase stand out
Select a caption clip in Premiere, set Apply to to Selected, then change the colour: only that caption changes. Great for the one line that sells the video.
Split · Join · Retime · Close gaps
| Tool | Key | What it does | When to use it |
|---|---|---|---|
| Split | S | Cuts the caption under the playhead in two, right there. Its words go left and right. | A caption is too long for one breath |
| Join | J | Joins the selected neighbouring captions into one. With one caption selected, joins it with the next. | A phrase got cut in a strange place |
| Retime | R | Shares a caption's time across its words again. | You trimmed a clip or changed its words in Premiere |
| Close gaps | G | Stretches each caption to the next one. Only the selected captions if you selected some, otherwise the whole track. Pauses over 2 s stay empty. | Text blinks off between phrases |
Graphics, CC track or SRT?
Graphics on the video
Burned into the export, animated, in your brand. For social, ads, short-form.
Another copy on a new track is the easy way to A/B two looks: hide one track, compare, keep the winner.
Premiere's caption track
Real, switchable captions for accessibility, broadcast and platforms that read caption tracks. Uses ② Lines & caps; the looks don't apply.
A subtitle file
For YouTube, Vimeo, a client or a translator. Also uses ② Lines & caps. A .captionlab.json next to it keeps the word timing for later.
Undo with ⌘Z
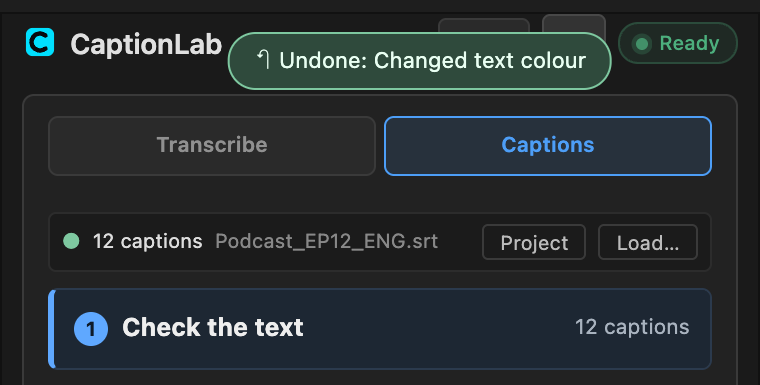
Editors live on ⌘Z, so CaptionLab plays along: every CaptionLab action is one step in Premiere's History. Press ⌘Z in Premiere, or in the panel, and the whole step goes back: a Replace across 40 captions, a new look, a Split. A small note at the top of the panel says what was undone. ⇧⌘Z brings it back.
- The note says what ⌘Z just undid.
 1
Editing captions in Premiere
The clips are normal Premiere graphics: move them, trim them, delete them, change a word in the Essential Graphics panel. CaptionLab reads the clips back before every change, so your hand edits are kept. The ↻ button next to On timeline reads them right away.
- Trimmed a caption or changed its words? Select it and press Retime, so the highlight follows the new length.
- Moved a whole block of captions? They keep working. If many were deleted, + Animated track puts a fresh, complete set on a new track.
- New transcription of the same video? CaptionLab never mixes it with older captions on the timeline. It adds the new ones as a new track.
Settings menu & keys
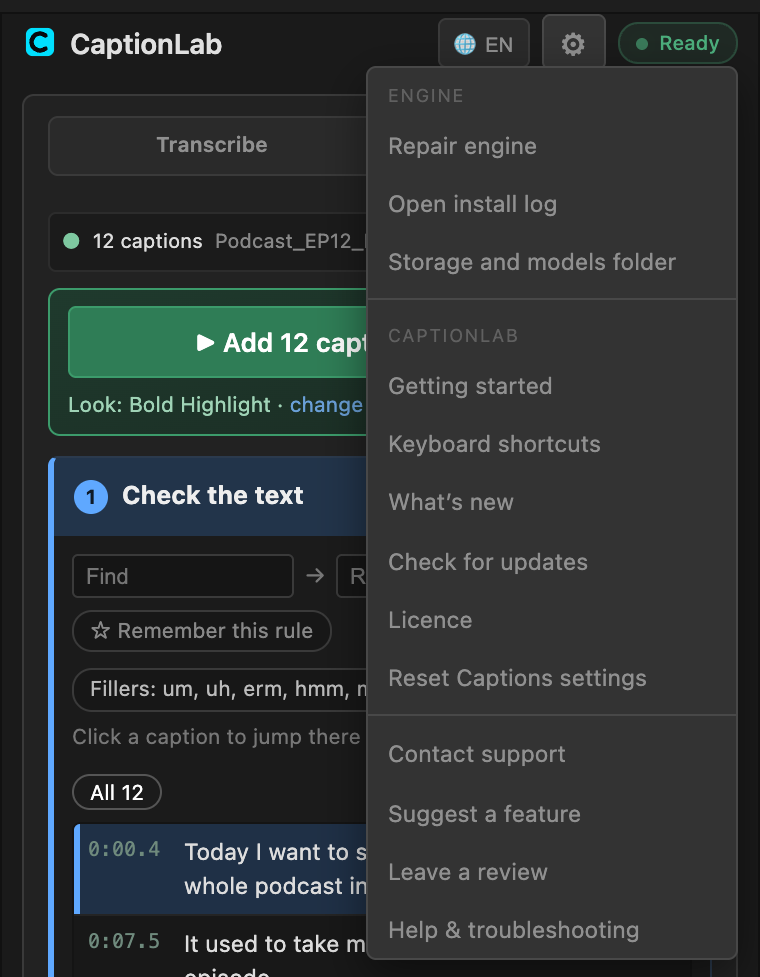
The ⚙ at the top of the panel:
- Repair engine, Open install log, Storage and models folder: the AI engine and how much space the models take.
- Getting started and Keyboard shortcuts: this guide in short.
- What's new, Check for updates.
- Licence: the email and order it's on, and how to move it to a new computer.
- Reset Captions settings: the look and the lines back to how they came. Your captions, rules and My looks are kept.
- Contact support: an email with your version, Premiere and system already filled in.
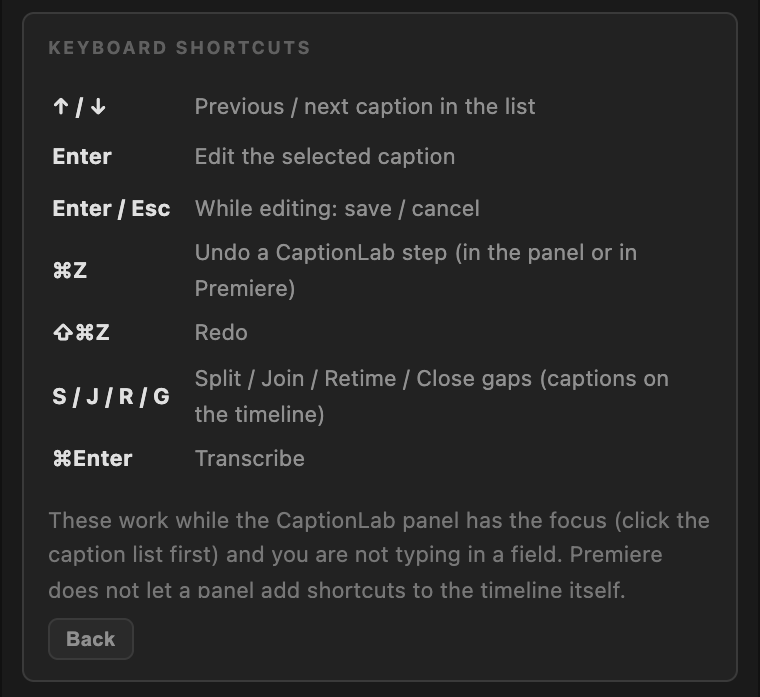
Every key in one place
| ↑ ↓ | Previous / next caption in the list |
| Enter | Edit the selected caption (Enter saves, Esc cancels) |
| ⌘Z / ⇧⌘Z | Undo / redo a CaptionLab step |
| S J R G | Split, Join, Retime, Close gaps |
| ⌘Enter | Transcribe |
On Windows read Ctrl for ⌘.
In your language
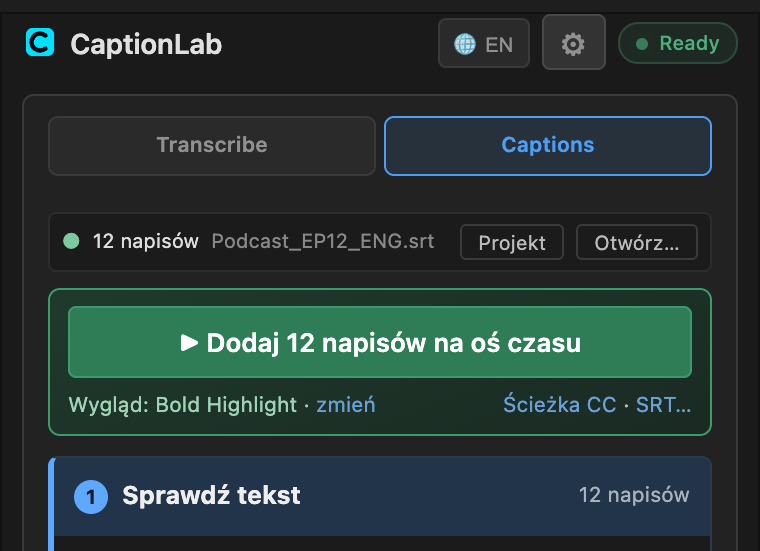
The Captions tab speaks Polish, Ukrainian, Romanian, Turkish, Arabic, Czech, French, German, Spanish, Thai, Hebrew, Hungarian, Finnish and Croatian, on top of English. It follows the interface language you choose with 🌐 in the panel header.
Recipes
A Reel with punchy captions
1. Transcribe the 9:16 sequence. 2. ② Lines: 1, Max per line 16, All caps, No punctuation. 3. ③ Look: Yellow Pop. 4. ▶ Add to timeline. 5. ▣ On video → nudge Height to ~70%.
Burned-in and switchable
1. ② Lines: 2, 42 ch. 2. ▶ Add with Clean Box for the export with captions. 3. CC track for the accessible version. 4. SRT… to upload to YouTube Studio.
Names right, every episode
1. ① Find the host's name as the model writes it → Replace → ☆ Remember. 2. Next episode: click the saved chip. 3. Fillers → Remove. 4. Save the look under My looks.
Two looks, one decision
1. Add captions in look A. 2. Pick look B → + Animated track. 3. Toggle the track eyes in Premiere while the client watches. 4. Delete the loser.
FAQ & troubleshooting
I changed the look, but the captions on the timeline didn't change
Check Apply to at the bottom of the panel. With Selected, only the clips selected in Premiere change. Switch to This track or All.
The keys S, J, R, G don't do anything
Click the panel's caption list first. When the timeline is active, Premiere keeps these letters for itself.
⌘Z undid something else
⌘Z goes back through Premiere's History in order. If you did something in Premiere after the CaptionLab step (moved a clip, for example), that comes back first. Look at Window → History: CaptionLab's steps are the lines that start with CaptionLab · #.
A caption flashes by too fast to read
In ② raise Longest or lower Max per line, or Join it with its neighbour (select it, J).
The font looks different on another computer
That computer doesn't have the font. Install it there, or pick one of the ready looks, which only use fonts that every Mac and PC has.
Can I export the captions with the video?
Yes. The animated captions are normal graphics, so they render with your export like any title. For switchable subtitles use the CC track or an SRT.
CC track does nothing in Premiere Pro 2022
Premiere 2022 does not let plug-ins create caption tracks. CaptionLab puts the SRT in your Project panel and selects it: drag it onto the timeline, and Premiere makes the caption track. From Premiere 2023 on, CC track does it for you.
Where did the Models tab go?
It moved. On the Transcribe tab, click Model ▾ under the language picker: it shows the model in use and opens the same list, to download, switch or delete models. How much space they take is under ⚙ → Storage and models folder.
Does this work offline?
Yes, all of it: transcription, captions, looks. CaptionLab never sends your audio or text anywhere.
Something else
⚙ → Contact support writes an email with your version and system already filled in. Or write to editlabtools@gmail.com.
Captions that move. Inside Premiere Pro.
One-time purchase · 99 languages · 100% offline · free 3-day trial